Product Review: OttLite OTL13MAG Task/Magnifier Lamp with Flip-Down Magnifier

>> 27 November 2011

OttLite OTL13MAG Task/Magnifier Lamp 
with Flip-Down Magnifier
I got an OttLite last night and I LOVE IT!  This product is amazing. I didn't think it would make that much of a difference but now it's a lot easier to see a night when I'm crafting.  My average desk lamp and home lighting was just killing my eyes so I had to limit my craft hours to day time. And when you work a 9-to-5 that doesn't leave you with very many day light hours especially now that we're in the fall and winter months.  But now I can work at night and see with great clarity what I'm doing.   

No this is not a sponsored post so please keep reading!

I'd seen OttLites at Michael's and Joann's but failed to understand what they were all about.  I mean, I thought they were just another task lamp targeted for seniors and baby boomers. But I was wrong.

Last night at my friend Victoria's monthly craft night one of the ladies was using one and I could see quite clearly the amazing quality of the light.  The most important thing to me was that it didn't cause glare and hurt my eyes.  Also, the colors looked of my handicrafts looked great when held beneath this light source.  

I asked Victoria where the nearest Michaels was and told her I'd be back.  I had a 50% off coupon and wanted to use it.  However, the OttLite was already on sale for 50% off rendering the coupon unusable to this purchase. This meant I could buy something else for half off! :) 

I ended up purchasing the OttLite OTL13MAG Task/Magnifier Lamp with Flip-Down Magnifier in Dove Grey. When I got back to craft night I set it up immediately. The assembly directions were probably the lamest thing about this product. They were were worse than an Ikea diagram!

Thank goodness there was one already set up and its owner showed me how it was assembled.  I also didn't know that to turn it off or on all you had to do was close the clamshell light to its base.  I honestly don't think I could have figured it out if she hadn't shown me.

Other than that, the product is of very high quality and I also love how because of that clamshell design because it makes the OttLite very portable.

Also, in addition to doing my crafts with it, I've read it's great for photographing your finished product.  I haven't done this yet but if you notice an improvement in the white balance of my photos either here or on Etsy you'll know why!

Like I mentioned, Michael's is currently having a sale on the OttLite for 50% off but I've found better deals on Amazon with free shipping.  This may all be due to the fact that it's Thanksgiving weekend so on-line retailers maybe competing with brick and mortar storefronts and slashing prices. But it pays to shop around.

Whatever you pay for your OttLite -- whether its  sale or not -- it's totally worth it.  This task lamp is probably my number one tool for crafting and art work ever.  Seriously.


A Day of Thanksgiving + Free Thanksgiving Clipart

>> 24 November 2011


Released in 1951 by Centron Corporation " A Day of Thanksgiving" is about a working class family  experiencing financial hardships and so the parents have to break the news to the kids that there will be no turkey for Thanksgiving this year.

The film was written during the dark period in American history: the era of the House of Un-American Activities Committee and McCarthy-ism.  While the film gets a bit preachy for my tastes and the acting a little stilted,  the message is still worthwhile: an attitude of gratitude for family and friends.  Of course it's said with more words than that, yet this simple film makes for historical interest in comparison to the economic hardships of the the nation today.  Just like the family in this film, I won't be having any turkey this Thanksgiving but only because I'm preferring to try a vegetarian meal this year. 

My gratitude for all that I am and all that I have is like this little poem I've scanned from "Book Trails" copyrighted in 1928: "I am grateful for health, for food, for love and friends." 

Enjoy the freebie and Happy Thanksgiving to you and yours!


Click to embiggen

Unique Paper Mache Materials Technique and Weldbond Adhesive Product Review

>> 20 November 2011

New hat displays and wig stands in my Etsy shop.

I just uploaded my latest creations of mixed media wig stands and hat displays in my Etsy shop and now I want to break it down as to how I made them. If I knew how awesome they were gonna turn out, I would have photographed a full on tutorial. But I didn't. When I started making them, I was just going by intuition so now I need to back track a little bit because I want to talk about some of the techniques and materials I used.

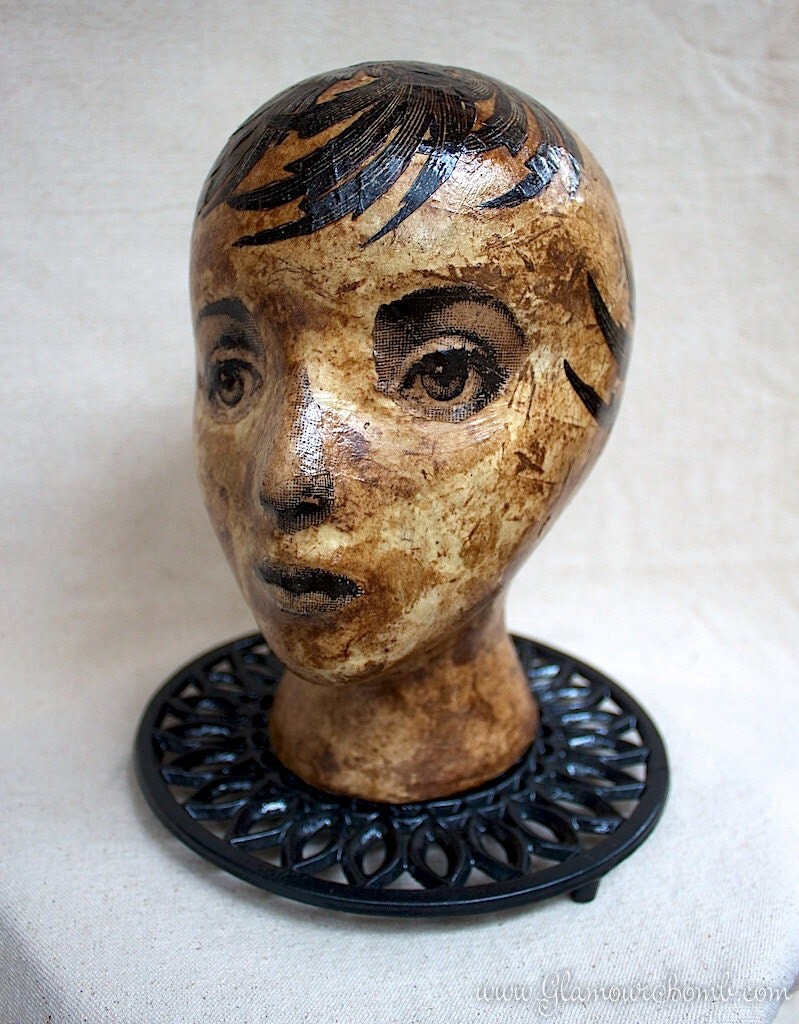
We'll begin with the fact that I wanted some pretty models for my vintage hats that I've have listed on Etsy.  So far I've used a beauty school dummy head (image left) which I think is OK, but I wanted to try something else.
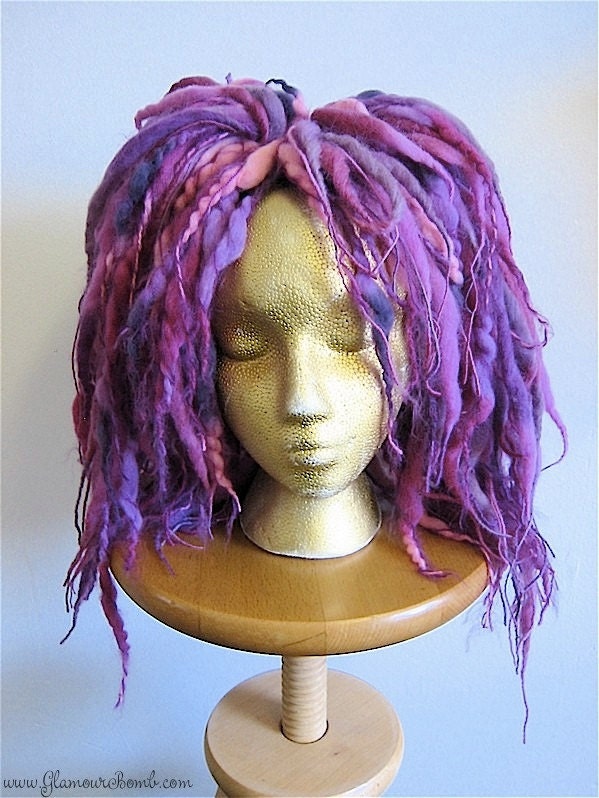
For my fairy kei wool dread falls, I use an average Styrofoam wig stand (image right) because I need to pin the falls into the head to make them stay on so I could photograph them. Now I think white Styrofoam looks cheap in a photo so I spray painted it gold to simulate a skin tones. I love the face on these displays, but I hate that Styrofoam. It makes it look like the skin is reptilian which is cool if you're going for that effect, but not good if you're trying to sell dread falls. I mean, wool dread falls are pretty avant garde already, but the reptilian skin is distracting and freakish and I think takes away from the product you're trying to sell.

So here comes my ideas for hat displays for my latest round of vintage hats.  I took the same Styrofoam head style and made "Becky" (image left). I paper mached her with coffee filter paper and wallpaper adhesive that I got at Lowes with the idea that the face's skin would be smoother.  I made three layers of paper mache and let it dry for a day in between.  Then I sanded it smooth.

This is the paper mache technique I'm talking about: coffee filters and wallpaper adhesive!  I had both of these on hand so instead of running out to get more supplies, I just used what I got with great results.  Just shred the coffee filter paper by hand and as for the paper mache paste, simply add water to a glop of wallpaper adhesive until you get a consistency you like.  I can't really advise as to what the water to adhesive ratio is.  I just added water and stirred it with the wallpaper adhesive until it was thick and creamy.

What's great about using these two materials for a paper mache pulp is that when I went to color the head with walnut ink (that I also make and sell on Etsy) the paper mache grabbed the ink the way I wanted it to.  Also, wallpaper adhesive is anti-bacterial. It's meant to be that way so that mold doesn't grow between the paper and the drywall when used as indicated. So that means your paper mache work won't rot either! 

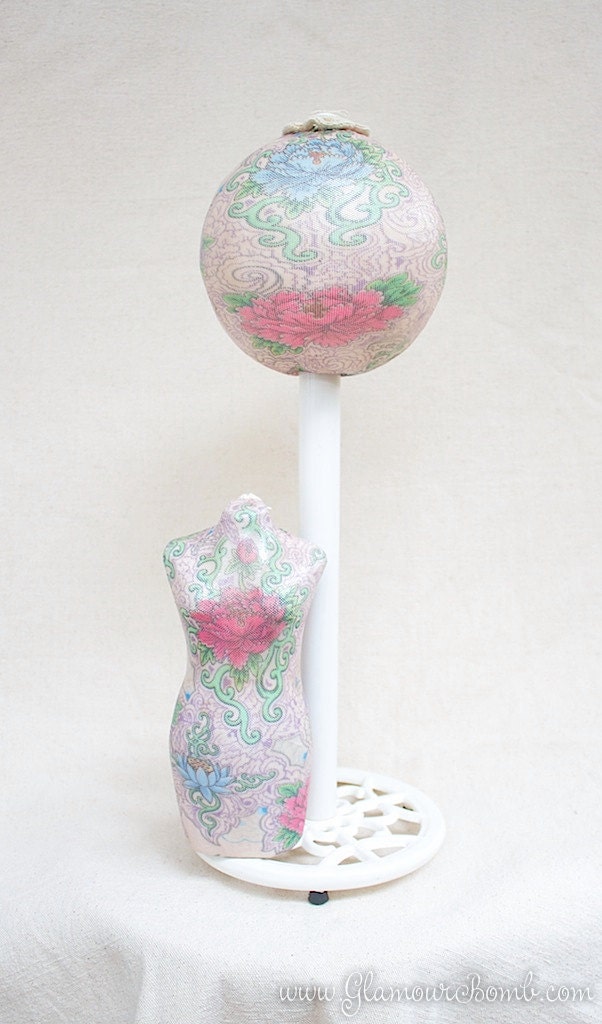
Now for shabby floral hat display (image right). I saw in the blog DIY Lunacy how Madz made a hat stand using Styrofoam ball.  I thought a paper towel holder would be perfect as a base because I wanted to mount the paper mache dress form you see pictured on the hat stand to use as a jewelry display.

To make this, again I paper-mached the Styrofoam ball with coffee filters and wallpaper adhesive to get a smoother texture.  Originally I  thought I was going to use the piece of metal that's on the side of the towel holder to mount the dress form but it just wasn't positioned where I wanted it to so I just removed the stick completely and mounted the dress form (as well as the ball) to the base using Weldbond glue.

Let's talk about Weldbond glue! It's pretty amazing!  All this time I've been using E-6000 for any and all serious hardcore adhesion applications. But now I think if I can use Weldbond on a project, I'll opt for that instead.  I love it because it's just as strong as E-6000 but not as stinky. So no fumes and no headaches.

Weldbond is also elastic and stretchy like E-6000 so things you adhere with it won't crack off as easily like hot glued projects. I also love Weldbond because it acts like your average Elmer's white glue when you apply it, so therefore I have a better experience in working with it to get the results I want.  E-6000 is more gooey and tacky like a relentless booger and I find it really hard to work with.  But Weldbond is water based glue therefore if you get it on something like your clothes, you can rinse it off with cold water. Just be sure to do it RIGHT AWAY before the glue hardens and sets.  Finally, Weldbond can be tinted with tea, paint and even nail polish.

Now I don't want to bash E-6000. It's still great stuff. I've been using it for years and will continue to do so with the right application to a project. For the record Weldbond has it's limitations but they weren't applicable to my hat stands and wig displays so I gave it a try and as you can tell, I really like it.

As things turned out, both these hat displays are really pretty in and of themselves but as a photographer's model for my vintage hats I find that they distract the eye.  I can't tell whether to look at the featured hat or look at the model.  I think they work as a unique piece of home decor or even better as a display in a boutique or crafts booth. So it looks like I'll keep experimenting with some ideas but use the old beauty school dummy head until I get the right model!

For the records, I am just a crafty vixen and not an employee for Weldbond. Furthermore, I have received no compensation to blog about them. However, if you work for Weldbond and you're reading this blog, can you please kick down some free product for me?  I'll try to think of more projects to make with it! =)  And if you're a rep for E6000, if you guy's kick down some free product I'll come up with unique and fantastic project that only E6000 can handle. XD

Oh, what an adventure I've had today!

>> 06 November 2011

See this hat on Etsy!
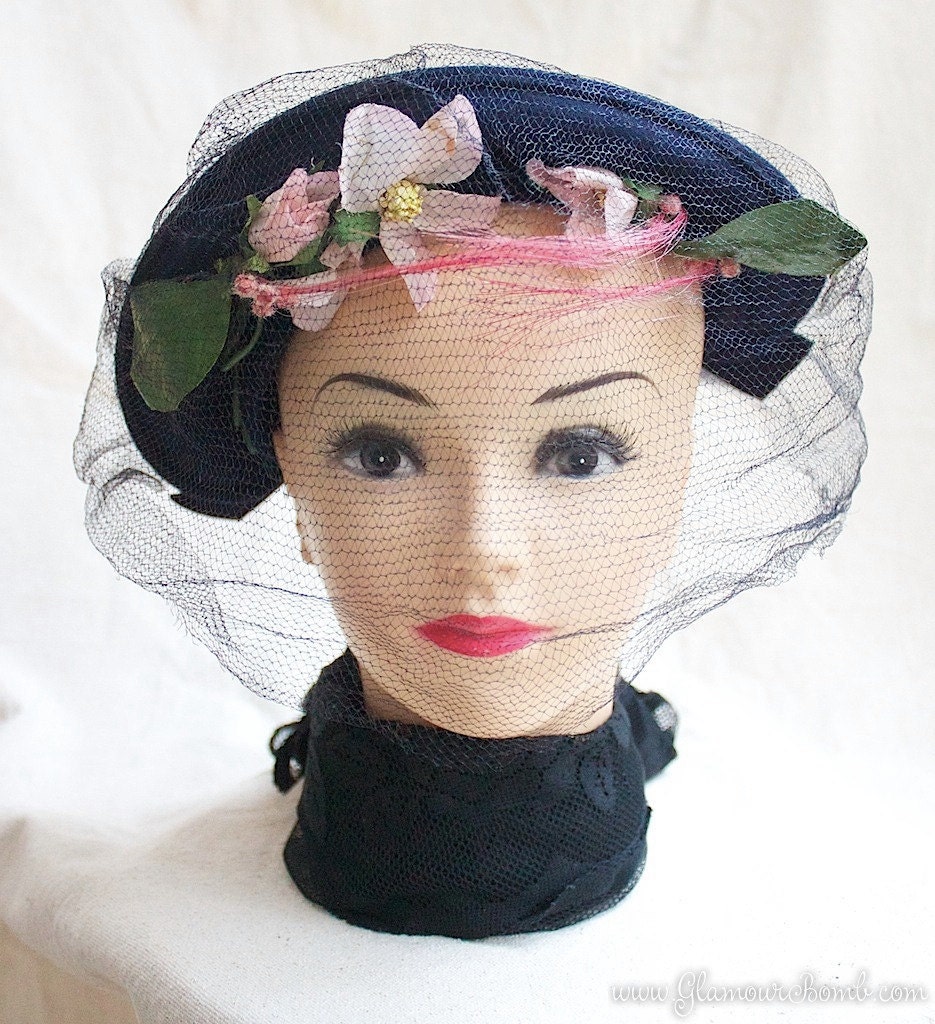
I was originally going to list this post in the "shop" portion of my blog but I simply had to tell you this amazing story of my armchair travels today.  It started when I went to list a vintage hat by American designer and milliner Marian Valle (left) in my Etsy shop.  It's cute, don'tcha think?

Well anyway, one of my favorite things to do when I offer up a vintage gem is to do a little research about the item and share the story of how it came to be.  So I type in "Marion Valle" and hit "I'm feeling lucky" and the first thing to surface is another hat by Valle that's also featured on Etsy. Isn't that funny?

Milliner Marion Valle's Spring Collection

I'm starting to really like Miss Valle's designs, but I still have no information on her so I dig a little deeper into my search and up pops this old news story from the Montreal Gazette dated March 22, 1934 in which Valle is interviewed for her new spring collection of hats. She is quoted as saying: "The upturn of our spirits is making itself felt in an upturn in our hat lines as well."

I continue  reading this edition of the paper when  I come across this amazing story about how Catherine Theresa Carr,  a 24 year-old Irish domestic from Belfast, spent eleven gruelling days hidden in a lifeboat on the ocean freighter Sulairia without food or water as she attempted to illegally immigrate to Canada.  She barely survived the ordeal and was taken into custody by immigration officials who promptly threw her in a hospital to recover from the effects of frostbite and extreme exposure upon docking in Halifax before deporting her.  The thing that fascinated me the most was that she said she was without hope with the prospect of being returned to Ireland and that she willingly suffered her hardships to come to America because back home "they work you to death."

A little more searching, and I learned from DIPPAM, an online virtual archive relating to the history of Ireland, and its migration experience from the 18th to the late 20th centuries that Miss Carr had made it back to Liverpool via the Cunard liner "Scythia".  Her story ends there, but still I wonder: what happened to her after that?  She would be 101 years old if she were alive today.  Oh, I'm so curious!

Laura Ingalls, American Aviator
At any rate, I continue to read the paper and learn about American aviator Laura Ingalls (not to be confused with author Laura Ingalls Wilder of the "Little House" series of books).  Laura Ingalls was was the first woman to fly over the Andes. She also made the first solo flight around South America in a landplane, the first flight by a woman from North America to South America, and in so doing, set a woman's distance record of 17,000 miles.

Lilyan Tashman, Actor
Finally, on the same day that these other previously aforementioned women made the news, I come to learn that glamorous movie star Lilyan Tashman died at the young age of 37 due to cancer.  A little more searching reveals that Tashman was a lesbian who had an affair with Greta Garbo!

I must say: phew!  It's been quite a day surfing  the net and learning all about what happened on March 22, 1934 just so I could list my pretty little chapeau on Etsy.   I'll wrap this up with a clip from 1931 film "Girls About Town" (below) featuring Tashman and directed by George Cukor.


Related Posts Plugin for WordPress, Blogger...

  © Blogger template by Ourblogtemplates.com. Custom theme by Glamour Bomb, 2009.

Back to TOP