

Unique Paper Mache Materials Technique and Weldbond Adhesive Product Review
>> 20 November 2011
 |
| New hat displays and wig stands in my Etsy shop. |
I just uploaded my latest creations of mixed media wig stands and hat displays in my Etsy shop and now I want to break it down as to how I made them. If I knew how awesome they were gonna turn out, I would have photographed a full on tutorial. But I didn't. When I started making them, I was just going by intuition so now I need to back track a little bit because I want to talk about some of the techniques and materials I used.
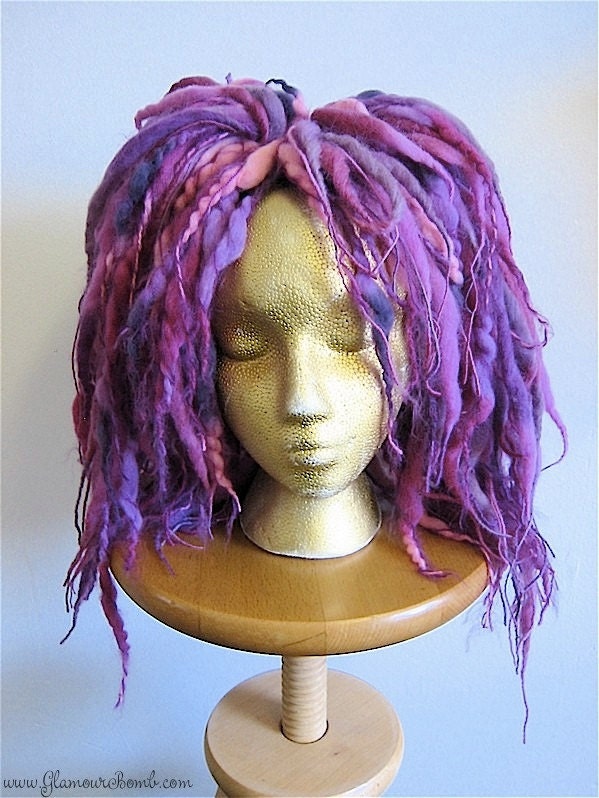 For my fairy kei wool dread falls, I use an average Styrofoam wig stand (image right) because I need to pin the falls into the head to make them stay on so I could photograph them. Now I think white Styrofoam looks cheap in a photo so I spray painted it gold to simulate a skin tones. I love the face on these displays, but I hate that Styrofoam. It makes it look like the skin is reptilian which is cool if you're going for that effect, but not good if you're trying to sell dread falls. I mean, wool dread falls are pretty avant garde already, but the reptilian skin is distracting and freakish and I think takes away from the product you're trying to sell.
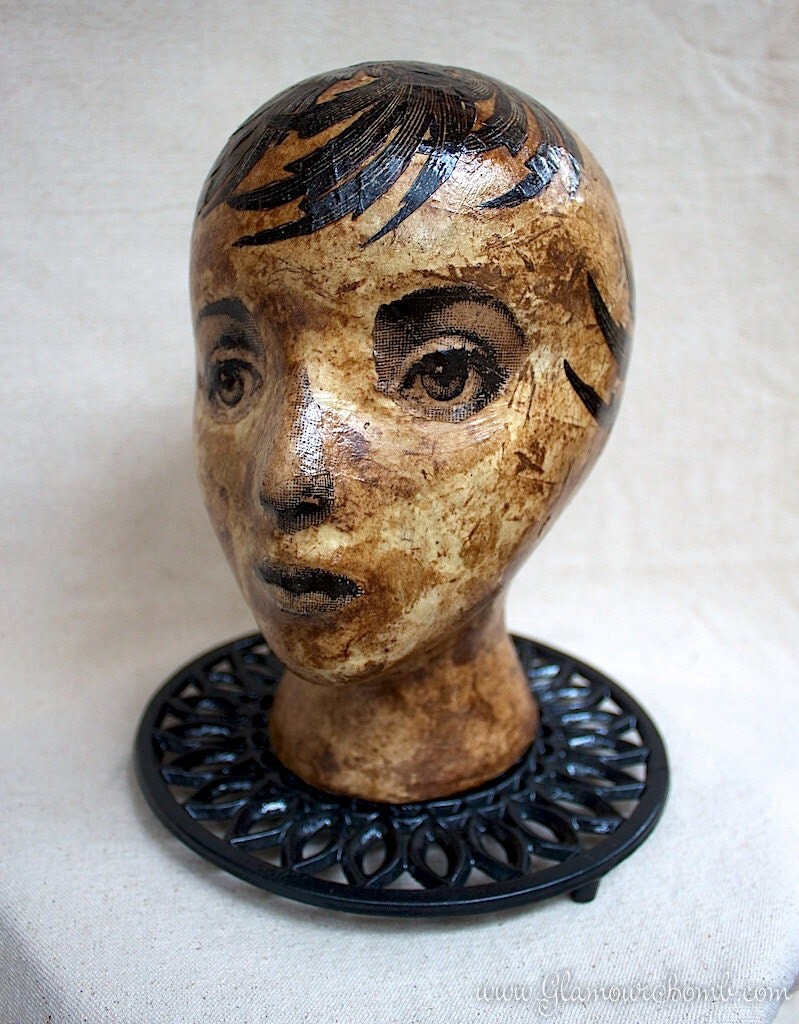
This is the paper mache technique I'm talking about: coffee filters and wallpaper adhesive! I had both of these on hand so instead of running out to get more supplies, I just used what I got with great results. Just shred the coffee filter paper by hand and as for the paper mache paste, simply add water to a glop of wallpaper adhesive until you get a consistency you like. I can't really advise as to what the water to adhesive ratio is. I just added water and stirred it with the wallpaper adhesive until it was thick and creamy.
What's great about using these two materials for a paper mache pulp is that when I went to color the head with walnut ink (that I also make and sell on Etsy) the paper mache grabbed the ink the way I wanted it to. Also, wallpaper adhesive is anti-bacterial. It's meant to be that way so that mold doesn't grow between the paper and the drywall when used as indicated. So that means your paper mache work won't rot either!

To make this, again I paper-mached the Styrofoam ball with coffee filters and wallpaper adhesive to get a smoother texture. Originally I thought I was going to use the piece of metal that's on the side of the towel holder to mount the dress form but it just wasn't positioned where I wanted it to so I just removed the stick completely and mounted the dress form (as well as the ball) to the base using Weldbond glue.

Weldbond is also elastic and stretchy like E-6000 so things you adhere with it won't crack off as easily like hot glued projects. I also love Weldbond because it acts like your average Elmer's white glue when you apply it, so therefore I have a better experience in working with it to get the results I want. E-6000 is more gooey and tacky like a relentless booger and I find it really hard to work with. But Weldbond is water based glue therefore if you get it on something like your clothes, you can rinse it off with cold water. Just be sure to do it RIGHT AWAY before the glue hardens and sets. Finally, Weldbond can be tinted with tea, paint and even nail polish.
Now I don't want to bash E-6000. It's still great stuff. I've been using it for years and will continue to do so with the right application to a project. For the record Weldbond has it's limitations but they weren't applicable to my hat stands and wig displays so I gave it a try and as you can tell, I really like it.
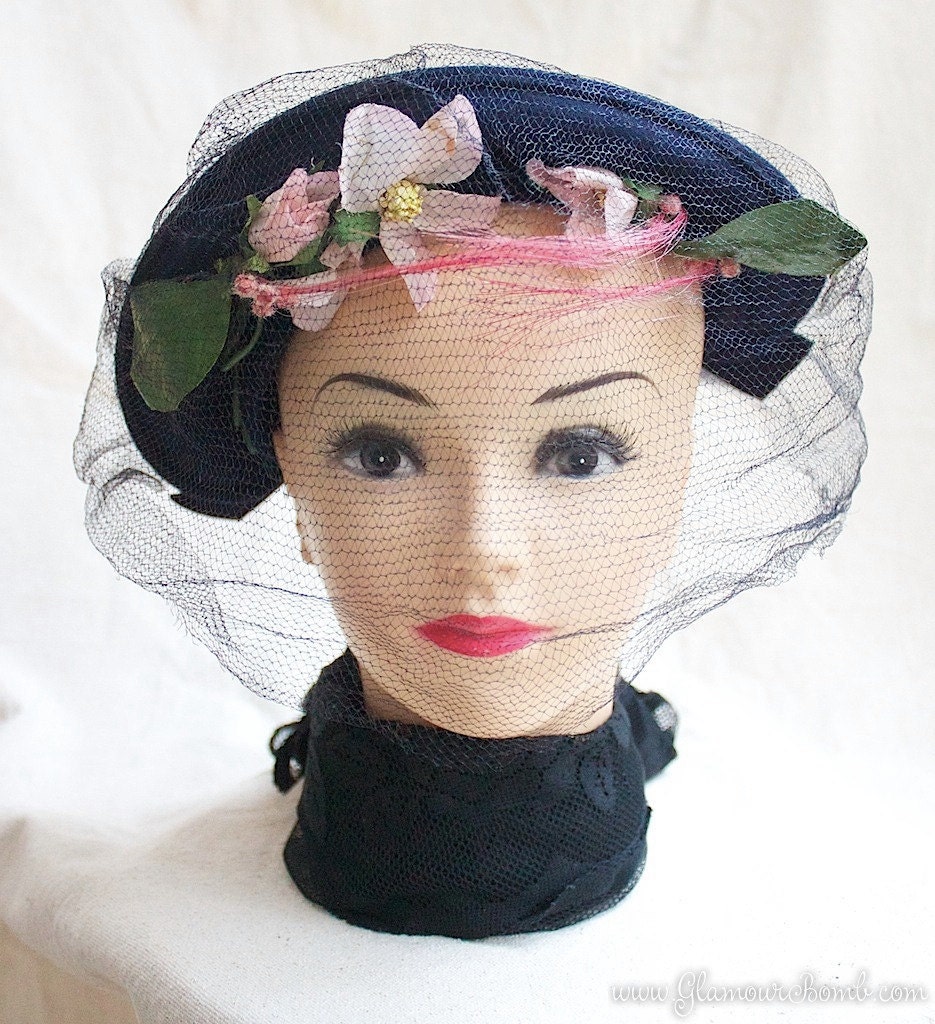
As things turned out, both these hat displays are really pretty in and of themselves but as a photographer's model for my vintage hats I find that they distract the eye. I can't tell whether to look at the featured hat or look at the model. I think they work as a unique piece of home decor or even better as a display in a boutique or crafts booth. So it looks like I'll keep experimenting with some ideas but use the old beauty school dummy head until I get the right model!
For the records, I am just a crafty vixen and not an employee for Weldbond. Furthermore, I have received no compensation to blog about them. However, if you work for Weldbond and you're reading this blog, can you please kick down some free product for me? I'll try to think of more projects to make with it! =) And if you're a rep for E6000, if you guy's kick down some free product I'll come up with unique and fantastic project that only E6000 can handle. XD


0 comments:
Post a Comment